
I am a huge fan of crafts and have been going crazy with small projects around the house. Since Cory had to work today, I thought I would take some time and post with you all a small craft that I love to do. Modge Podge Outlet Covers. It's a mouthful I know, but I promise you it is very simple and quick to do.
Here's What You'll Need

*Scrapbooking Paper
*Modge Podge (craft glue)
*Foam Paint Brush
*Box Cutter or Switch Blade
*Screwdriver (to take off/on cover)
*Outlet Cover
* Newspaper ( this can get a little messy)
After you gather all of your tools, lay the scrapbooking paper face down making sure you turn the paper the way you want it. Place the outlet cover, face down on the paper and use it as a template to cute around the plate. You'll want to leave about 1/4 of an inch of paper on the sides to pull over the edges.

Cut to size
Once the paper has been cut to size, you will want to glue the front of the faceplate to the back of the paper. Add enough glue to make the plate tacky, you don't want to glop it on. Using too much glue will cause the paper to tear and become messy.

Use your Foam Brush to Apply Glue
Place the faceplate, glue side down, on the back of the paper pressing firmly to secure in place. Make sure you have the paper turned the way you want it, you don't want to glue it sideways. Once the faceplate is the glued the way you want it, you will need to glue the sides and edges. Use a little more glue on the sides and edges to make sure it stays in place. The corners will become thick with paper if you don't trim them down, so the extra glue will help keep it in place while you work the paper.
Glue the Sides and Edges
Now you will fold over the edged of the paper over the side of the cover. Make sure to pull the paper as you fold, to avoid air bubbles. If you get air bubbles, you can use the side of your brush to push them out at the end. If you have too much paper in the corners, you can trim off the excess, but be careful not to cut off too much, that can result in bare corners. I've done this a few times, and if your lucky, you can hide it, or turn it to the bottom.

Use The End Of Your Brush To Push The Paper Along the Edges
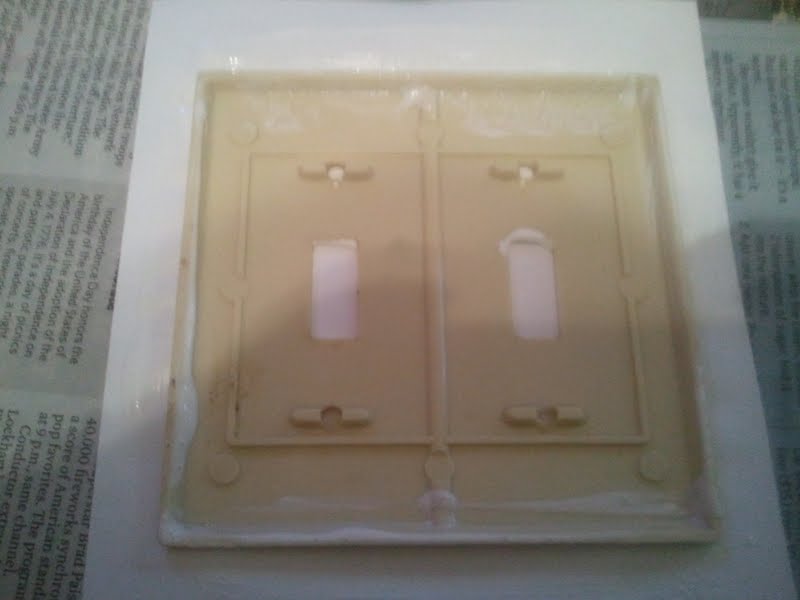
Here's where it can get a little tricky. You Will need to use the knife, or blade, to cut out along the backside of the paper where the switches go. Follow along the edges if the cutout and you should be fine. If your blade is too big, or not sharp enough, it can pose a problem. Make sure you are very careful, and if you need help, ask!
* The Mommy Blog does not condone children using knives. Children or young adults, ask your parents for help. Once you have the hole cut out, use the tip of the blade to poke small holes where the screws go. You will notice on the front the small impressions guiding you where they go.
Don't worry about the holes being too small, just push the screws through the paper, it won't tear it.
After you put the screws in, you can now place it back where it belongs. Screw it into place and you have a custom light switch cover that costs less than what you will find in a hardware store.

Here's The Finished Product
This is in my kitchen, that's why I used cupcake paper!
If ever you get tired of the paper, just peel it off and recover! It's that simple!
Here's a review of the steps
*Gather Materials
*Cut Paper To Size
*Glue Front Of Plate
*Place Plate On Backside Of Paper
*Glue Sides And Edges
*Pull Paper Over Edges
*Cut Out Switch Area
*Poke Holes For Screws
*Put Screws Back On
*Add To The Wall
*Enjoy!
Here are a few others that I have done around my house!


You can match to the colors of your wall, or just use a fun paper that you like. These are perfect to add flare throughout your house, and I bet the Kiddo's will love to have a personalized one in their bedroom! It is such a fun and simple craft project to do, everyone will want to join in the fun!
*Brittany*


I should say that I forgot to mention you will need scissors to cut the paper to size! You can use the blade to get a clean edge, but scissors will work as well too! Sorry!
ReplyDelete