
My family and I have been busy as we excitedly prepare for the arrival of another beautiful baby girl in just a few months. After a fresh coat of paint, we’re finally ready to decorate the nursery. There are so many options and I think I considered most of them. I looked at wall stickers, wallpapers, stencils and nearly settled on painting a mural myself. But then I came across some large paper roses and other flowers on Etsy and knew they’d be perfect. The problem was that they were very expensive and I worried I’d be disappointed if they weren’t just as they looked online. So I set off to learn to make them myself. I found some tutorials online and found all of them lacking in some way. So in the tutorial below, you’ll benefit greatly from my stops and starts, and my trials by error.
By following these instructions you’ll be able to make beautiful paper flowers that can be used as a backdrop for a wedding, bridal shower, baby shower, or just a decoration in your home.
Materials
Card Stock (12x12 worked better for the bigger flower)
Scissors (circuit machine)
Flower petal template
Cake circle or cardboard circle
Glue gun and glue sticks
Step 1 Print out a template
Print out a template.
A quick google search of “templates for paper flowers” will yield you tons of options
so take your time and find just the right one that fits your vision.
I found mine at www.flowerstemplates.com which has several options you can download for free.
I chose this one because it has a little movement in the petals which I thought made it look a little more
realistic. (see link below) I printed the template in a few different sizes and made patterns out of some old manila folders.
https://www.flowerstemplates.com/rose-giant-paper-flower-template/

Step 2 Make the petals
I went ahead and made all the petals for the multiple sizes and colors of flowers I wanted to make.
I found 12x12 card stock worked well and I could get more petals out of that size paper than the 8.5x11
pages. For these flowers, I found that 8 of the smallest petals, 6 of the second smallest, and 5 of the other
sizes worked best for me. Some of the tutorials showed different numbers of petals but this number made
a full flower. I drew all the flower petals onto the card stock and then cut them all out. You could use a
circuit to do this if you have one.


Step 3 Cut out cardboard circles
You will use cardboard circles as the base for your flowers. Some of the tutorials suggest using cake
plates, which would work great, but I had some boxes left over from all my Christmas Amazon shopping
so I just cut out my own. I used different coffee mugs (which my husband says I have way too many of
) to make the smaller circles and then a small bowl to make the larger circle. The best way to figure out the
correct size circle is to set your largest pedals out in a circle and put a cup/bowl in the middle and have it
just overlap the bottom of the pedals.
Step 4 Prep the petals
To prep the petals, you’ll need to curve the corners. I used a pencil on the smaller petals and a Crayola
marker for the larger petals. All you have to do is roll the paper around the pencil/marker.

Then you’ll snip the bottom of the petals up the middle so that we can shape the base of the petals.
(This will make more sense in step 5)

Step 5 Shape the base of the petals
Now it’s time to get your glue gun out. There was lots of trial and error for me on this step. Lots of messy
mishaps with my glue gun as well. It’s my hope that you, dear fellow crafter, that you’ll benefit from my
sticky experience.
My glue gun has two settings. At first, I used the high setting, not knowing the difference, and had a few
glue blowouts you will see in some later pictures. Then I decided to try the lower setting which worked
much better. Use the lower setting!
You’ll now glue the bottom of the petals so that they will stand up and not be flat by overlapping the flaps
and gluing them together. The smaller the leaf the larger the overlap (that will make them stand up straighter).
The bigger leaves will need less overlap and the biggest leaves will need very little overlap.


Please note that when you do your overlap, the smallest petals will curve in at the top while the rest will
curve out as pictured below.

Step 6 Glue your petals to the base
Now that we have all of our petals prepped we are ready to assemble! I started with the biggest petals.
You will glue them onto your cardboard circle on the edge. The petals will overlap on the same side as
seen in the pictures below. Note that the very first petal will only be glued on one side so that as you get
to the last petal you can tuck it in under the first one. I also put a dab of glue on the bottom side of the body
of each petal so that they stick together and don't just flop around. The other layers don't really need the side
glue because this layer will keep them in.


Now you fill in with the other layers of petals. You will do a layer at a time until you hit the smallest petals
Do not glue these in yet. As you glue the layers, remember to leave one side of the first petals unglued to tuck
the last one in. Here you can see this is where my glue gun decided to spread its "glueiness" everywhere.


Step 7 The rosebud
And now we are at the final part of our journey, the rosebud.
We will again be working petal by petal but not gluing to the board yet.
First, you will take two petals and glue them opposite of each other at the bottom
(see You will curve these two petals around each other to form the “bud” and glue them together.


You will then work with two petals at a time, gluing them in the opposite direction
of the last two petals on the bottom. Then glue them up on the sides until you are out of
small petals. For the bigger flowers, it seemed to work better to glue the last four on at one
time and curl them around together.


Once you are done with the rosebud it is time to glue it into the center of your flower.
I put some glue on the board and some on the bottom of the bud and then inserted it into the center.
I used a pencil to stick into the center of the bud to push it down to make sure it was glued and secure.


Step 8 Brag to your friends and family!
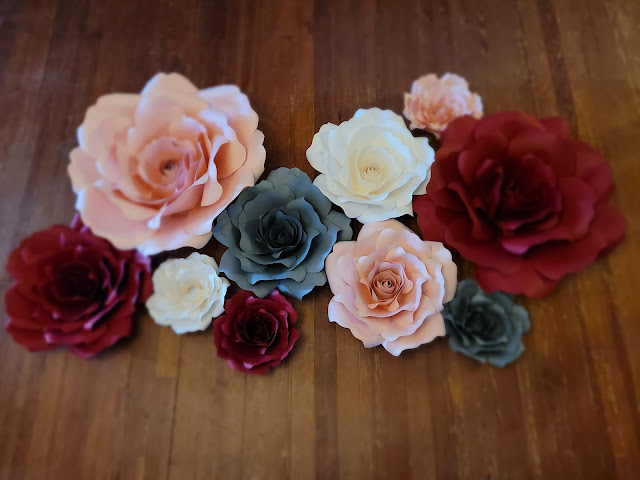
Congrats fellow crafter! If you made it this far you now have a beautiful large paper flower
and will want to make a bunch more. As you make more the process will get easier and quicker.
It took me a good half an hour to make my first flower, then an hour or so to make all the rest.
This is a great project for older kids to do as well if you trust them with a glue gun and scissors.

If you make some flowers, please share some pictures of your creations!


No comments
We love hearing from you! Thanks for leaving us some comment love! If you're a new follower, please leave your link, so we can follow you back!